1) Paint, the easiest and cheapest
2) Contact or Wall Paper which I thought could be totally cool if I were able to locate a retro or mod print. However, my lack of confidence in the DIY department discouraged me from this option pretty quickly. My other reason for not going with wall paper is the level difficulty for future change (with paint, all you need is more paint)
3) Veneer or Skins. These are very thin panels of wood that you adhere with glue and finishing nails. I've used some of these for the pantry in my (home) kitchen with success in the past. But again, a professional would be required for the installation, so at the end I went with good old fashion paint.
I was quoted $275 - $500 from two different professional painters, but I ended up doing it myself. I think it turned out great!


PS, the kitchen cabinets (bottom) look much lighter than the bathroom and closet doors (top) but they are actually the same color in person. The latter photo was taken with a point and shoot camera, and as you can see....the color representation just wasn't there. As a photographer, I just couldn't let it go. So I trekked back to the studio to get my DLSR and wide angle lens.
Old Walls and Cabinet Doors


Don't forget to prep your paint area with a good washing and Kilz primer. I used premixed TSP in a spray bottle (the no rinse formula) Although approximately 50% more expensive than the concentrated powder version, I saved time by not having to go back and rinse the entire area after initial application. I also used the anti mold Kilz Primer formula because of the propensity for moisture in a trailer. Am I paranoid, you bet!
I definitely wanted to get rid of the linoleum counter top and dining table but without any construction or carpentry skills, I had limited options. To cover my basis, I called a few kitchen remodel places to get a quote on replacing the counter. I couldn't get anyone interested because it was such a small job. Plus most only dealt with granite or marble, due to weight consideration, I wanted to stick with Formica or something similar.
While at Home Depot buying paint for the walls, I happened to come across a special paint by Rustoleum that was specifically made for linoleum counter tops that boasted no priming needed. I had my doubts but for $20, I was willing to give it a try as I had finished the cabinets and walls without much frustration. I went with a "Puddy" color. From afar, it almost looks like slate. I am very happy with the result.


Pictured above is an over the sink cutting board with strainer and stove top cover. Easy way to instantly double your counter space.
Old linoleum table top

PS. Notice the water stain on the wood? Read "Things to Look for at the Site Inspection" post for important info!
For the backsplash, I found aluminum stick on tiles for $10/24 pcs that went right over the existing tiles. So amazingly easy! Originally, I was going to cover the entire area. But decided that covering every other one was enough to distract from the ugliness, while still retaining a little bit of the 70's charm. What do you think? Should I have gotten rid of it all?

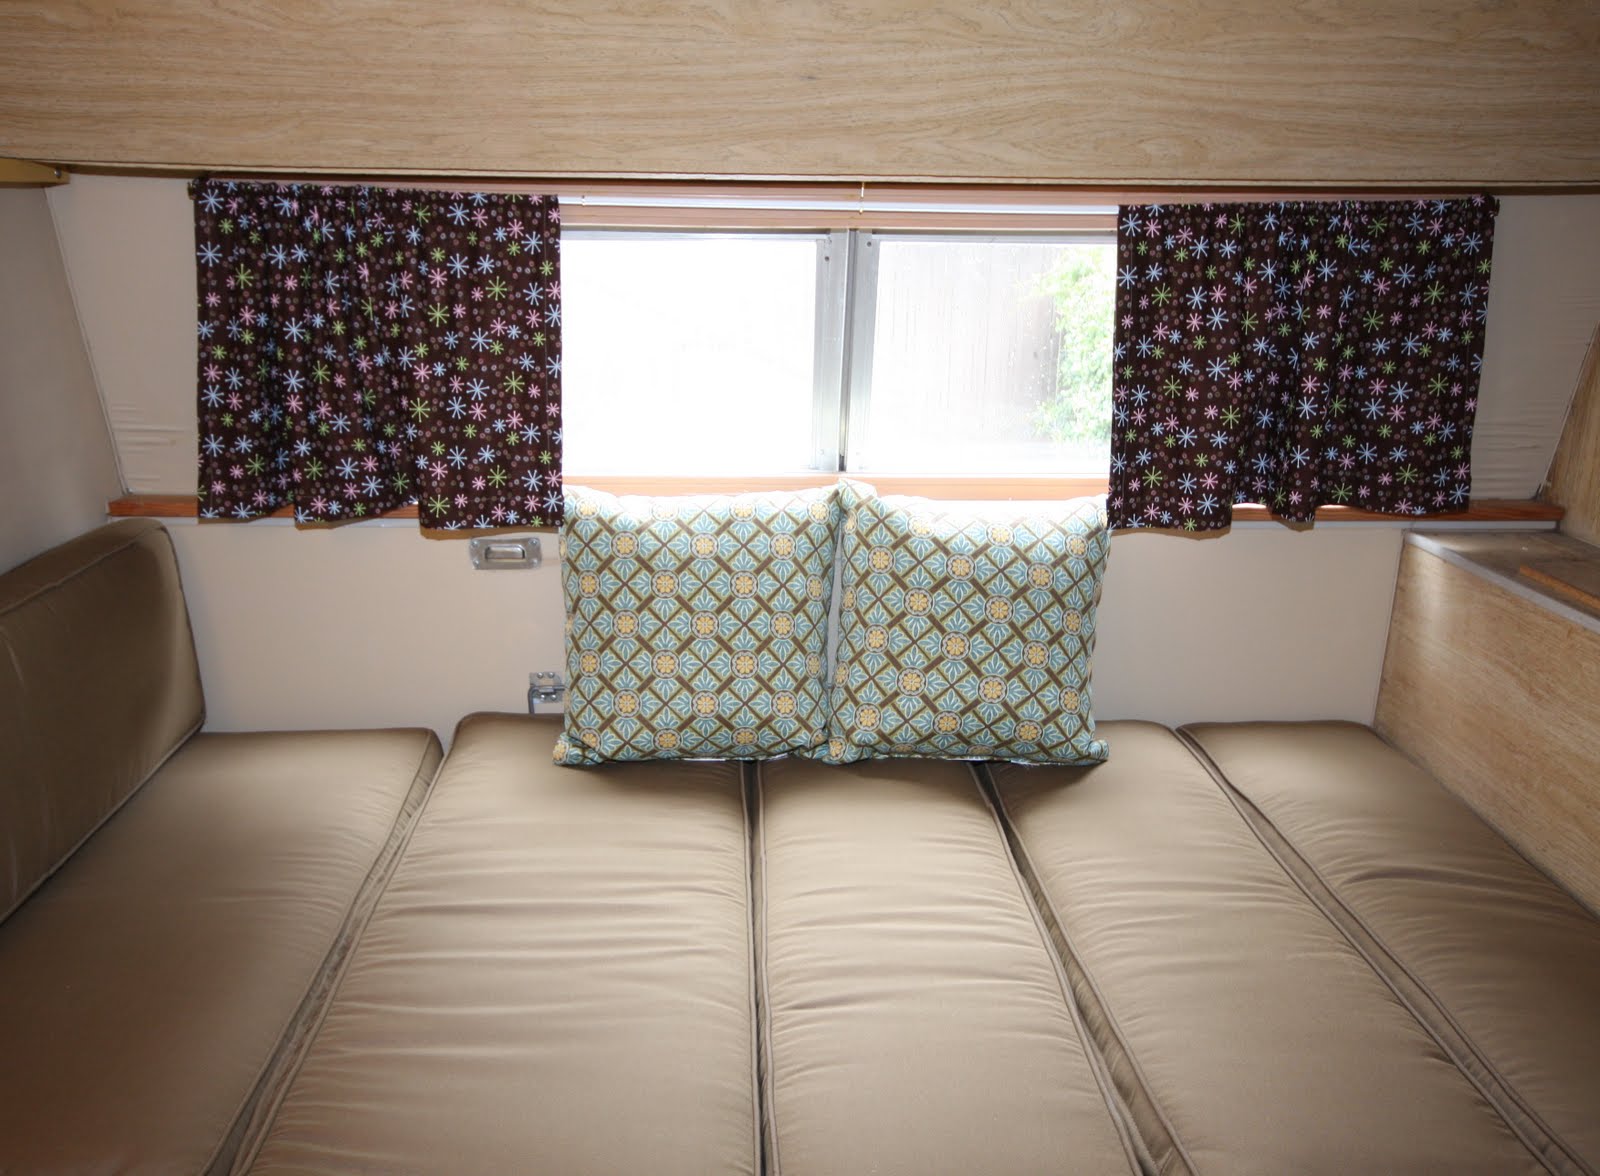
The biggest eye sore by far were the cushions. After a relatively easy time with painting and "retiling" the backsplash, I did not want to test my abilities or patience by taking on this enormous project. So I took it to a local upholstery shop. This was the most expensive part of the refurbishing process @ $450. Totally worth it because I would have been too distracted by the loud floral print to enjoy the rest of the improvements otherwise.
Although it costed a little more, I went with a Sunbrella material. I figured anything less robust would not stand up to the wear and tear needed in a camping environment.

Old Cushions

These are the cute curtains that I made and the extent of sewing I am able to muster. Take care to double side the material so your trailer will look adorable inside and out!

The rest of the tour....
Media Center.
Note: I replaced the plastic outlet and light covers with nickel plated ones for a modern look.

Dining table converted to lower sleeping area
Upper Bunk Bed opened. It's hard to tell from this angle, but there's a bunk bed that lowers. See the horizontal wood bar about 1/3 the ways down the top of image?

Here's the same area with the bunk bed hidden.
Clever right? I told you camping was neat!
Another sitting area

Same wall before painting

I saved the best for last. I had this decal made for her. So cute right? You can get your own custom decal at www.etsy.com (search custom vinyl signs) For $10, this really tied everything together.

I spent approximately $700 and roughly 15 hrs on this project. I am so glad that other deal fell through - see "How La Palace Came into My Life". Not only did I end up saving money and a trip to LA, I appreciate her so much more because of the time and labor I invested.
I hope you enjoyed her transformation. We have reservations for Mount Shasta and Pismo Beach in April. Check back to read about those adventures. And please email me if you have any tips for my maiden voyage!
No comments:
Post a Comment